Photo Walls and Romper Room
Romper Room and Photo Walls | Creating that Photo Wall You’ve Always Wanted
If you look in the archives better known as the Internet, you can search for an old children’s television show that featured a host who could easily been your old Kindergarten teacher. If I’ve sparked a memory, you know what I’m talking about. If not, no worries. Check out Romper Room when you have a moment, but for now, stick with me.
Getting back to the point of all this, what does Romper Room and Photo Walls have in common? First a little background: Romper Room was a children’s show shown in both local and national markets. The hostess, Miss “Insert Female Teacher’s Name Here” would play games, teach moral lessons, and eat with a group of children for nearly an hour. At the end of each show, the teacher would hold up a circular plastic mirror to her face (with the glass taken out, of course) and recite the rhyme, “Romper, stomper, bomper boo. Tell me, tell me, tell me, do. Magic Mirror, tell me today, did all my friends have fun at play?” She would then begin to name off random children’s first names whom she saw in “televisionland”. For example, she would say, “I can see Bobby and Karen, and I see Jimmy and Catherine” and so on. You would be excited if she mentioned someone with your name!
So how is Romper Room and a Photo Wall linked? That’s both easy and a cheap way to get you to read my post. Apologies in advance! Well, your photo wall is a place where anyone looking at it will play Miss “Insert Female Teacher’s Name Here” and start rattling off the names of those she sees on your photo wall! Besides foregoing the nasty wallpaper, we have a better way to decorate that lonely wall.
We can give you some ideas on what to put up there on that empty space and how to arrange them in a presentable way. The idea is to add lots and lots of photos on your wall in varying frames or canvas. Instantly, it makes any blank wall give you that warm, fuzzy, and cozy feeling. Our idea is quick and easy, but also relatively cheap. You can invest in large giclée canvases to fill the wall, but that would certainly drive up costs. This project will give you a photo wall that is light of the pocket book. The size of the project is up to you. You can make this project as large or as small as you would like. No matter the size, the wall will always be the conversation piece. Viewers will stand in front of the wall and take in the history of your lives. We’ll be mixing in old and new pictures with friends and family all in places we’ve shared.
Getting Started | Choosing Photos
- First things first. Photos. We have tons of them. Deciding what goes on the wall is the hardest part. Here’s what we did:
- Find the hidden gems both digital and prints
- Weddings, anniversaries, birthdays, graduations, vacation trips
- Find the most interesting and meaningful of the bunch
- smiling, laughing, joking, candid shots, etc.
- Avoid formal prom, blurry sports shot or staged photos. If you have to, go at a minimum.
- Limit the number of photos per person to 2-3 probably at different ages. Show personality!
- Find the most interesting and meaningful of the bunch
- Next. Frames or Canvas Prints. We mixed it up and where it was affordable, we used both frames and canvas prints.
- If you have frames, use them. A mixed of different frames adds to the unique arrangement. The different the better.
- If you need frames, here are a few places to look for interesting and low-cost frames
- Canvas Prints are affordable right here!
- Start Arranging Them Photos! How to hang what you have.
- Finding an arrangement format that works best for you depends mainly on the style you’ve placed nearest the wall. You may comfortable with a freer and more random grouping of similar frames in different sizes. In a more modern manner, you might favor toward a formal grid with matched frames and photo sizes. And on the other end, you might like the idea of mixing your family photos with varying sizes, shapes, and type. For instance, you might place a gold framed photo of Willy jumping into the pool next to grandma holding grandbaby on an 11″ x 14″ photo canvas. You might even place one of your favorite art pieces in the mix, as well. It’s always up to you. Here’s a shortlist of examples:
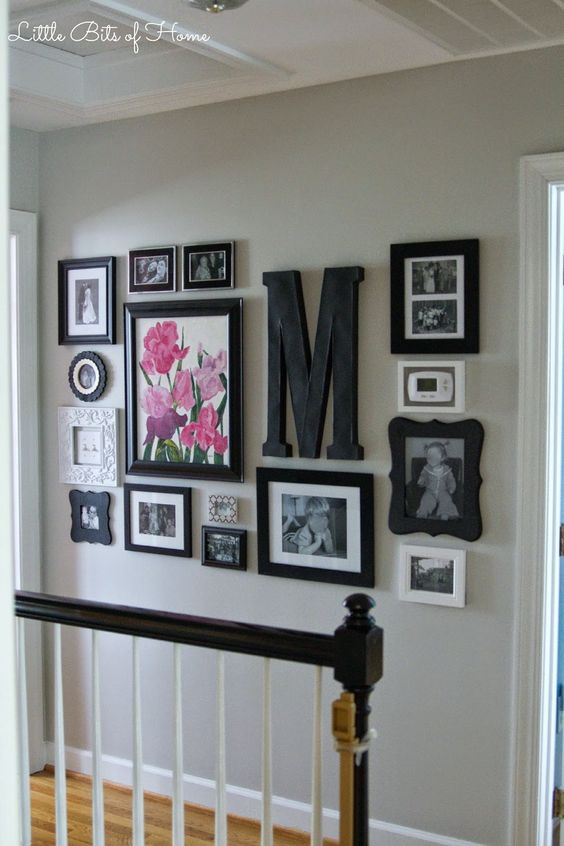
This is a sample photo wall (left) from the Little Bits of Home Blog. The layout is well organized to even include a frame around the thermostat! With all photos in black and white, the frames are unique in size and shape, but share a similar wooden tone. A favorite painting and family initial letter was added for an impactful element.
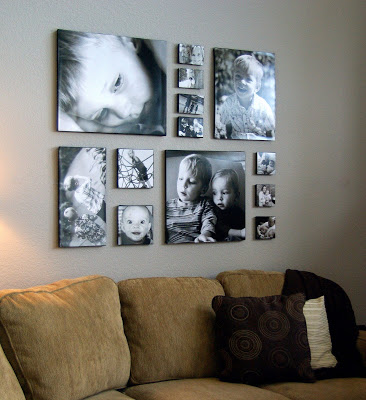
At the Crib Tales blog, a nice , clean arrangement of black and white imagery displayed on gallery wrapped photo canvas at varying sizes. This example focuses on the youthful stages of the kids with poses looking natural and not staged.
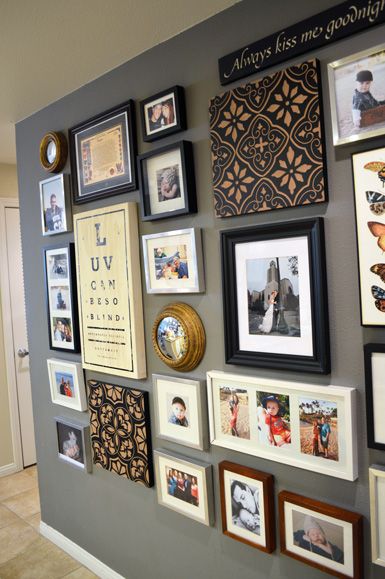
This example from Belle Maison 23 exhibits a wide range of photos from black and white to color and also shows photos from different time periods. Frame diversity is present and added to generate texture and space are quotation plaques, graphic ornamental pieces, and other interesting eye candy. The butterfly frame alludes to a personal hobby, where as the quotation calls out a family tradition of the “goodnight kiss”.

Romper Room?
Once you get the wall the way you want it, love it! Does it tell the story you want? Well, don’t get too attached! These modern times forces us to build our library of photos into a huge vault of memories. You’ll probably want to start another wall and then another. But before you plan another wall, try this: if you feel you need to add another wall, say in about a year, revisit the the old wall and see if you can update one or more photos you may have overlooked. Even if you didn’t know what Romper Room was (or don’t really care! :D), at least your photo wall will get viewed with fond remembrance.
Thanks for the visit!


